How to set-up VDI: Expert Guide for BPO Operations
18 Mar 2024 By: Michael Kansky
Updated
The COVID-19 pandemic popularized remote work globally, highlighting the need for virtual desktop infrastructure. Managing PCs, enforcing cybersecurity, and ensuring compliance became challenging, especially with employees using personal devices. HelpSquad, with over 300 employees who transitioned to remote work overnight, initially provided laptops and Chromebooks but soon struggled with remote management.
In the search for a resolution, We chose Azure VDI setup and Amazon Workspaces Web for affordable, efficient remote IT management with HIPAA and PCI compliance. This article compares the two, offers vdi setup instructions, and provides recommendations to help you choose the best fit for your organization based on our experience.

Don’t confuse Amazon Workspaces with Amazon Workspaces Web—though similar in name, Amazon Workspaces is more like Azure Virtual Desktop. This article focuses on comparing Amazon Workspaces Web and Azure Virtual Desktop.
It’s designed for BPOs or organizations seeking efficient IT solutions for remote staff. If you’re facing IT challenges, security incidents, sluggish PCs, connection issues, or need to enable remote access restricted to US/Canada IPs, this guide is for you.
What is a VDI setup?
A Virtual Desktop Infrastructure (VDI) is a setup that lets people use virtual desktops and apps from almost any device. Here’s how it works:
- Build the foundation – You pick the right hardware or cloud system to run everything.
- Create virtual desktops – These are digital “computers” stored on servers instead of physical machines.
- Keep it secure – Strong security settings make sure data stays safe.
- Connect users – A tool called a connection broker makes sure each person gets access to their own desktop.
Key parts include the hypervisor (which creates and manages the virtual machines), the virtual desktops themselves, and the connection broker (which handles logins and connections).
The success of a VDI setup depends on planning ahead: understanding what users need, choosing the right infrastructure, and setting up proper security.
What is Azure Virtual Desktop
Azure Virtual Desktop (Windows Virtual Desktop) is a Microsoft Azure service that virtualizes Windows OS, enabling virtual apps and remote desktops. It provides global access to a Windows desktop on any device, offering security, scalability, and easy remote IT management.
It suits businesses of all sizes, especially those with remote or traveling employees. Companies with high-security needs prefer it for secure remote access, minimizing data breaches. It’s also cost-effective, cutting hardware and on-premises infrastructure expenses.
What is Amazon Workspaces Web
Amazon WorkSpaces Web is a low cost, fully managed, Linux-based service, intended to enable secure browser access to internal sites and software as a service (SaaS) applications from standard web browsers, without the need to run appliances, maintain infrastructure, install special client software, or deploy virtual private network (VPN) connections. However, for added security, you might consider using a VPN, which is legal in most countries.
WorkSpaces Web secures browser-based productivity, supports safe browsing on high-security networks, and enables lightweight BYOD access for browser-only resources. With the right BYOD management solution, such as Scalefusion, in place, businesses can enforce security policies, manage access, and protect customer data across personal devices. With many workloads shifting to SaaS apps or internal websites, the browser is now a key productivity tool. Current browser security solutions are often too permissive, costly, or complex. WorkSpaces Web addresses these issues by offering simple, secure access to web content while managing data and connection risks.
Azure Virtual Desktop vs Amazon Workspaces Web services
Azure VDI Setup and Amazon Workspaces Web are distinct virtual infrastructure management services. The key difference is their utility. Azure Virtual Desktop is fully-featured, allowing users to install and run applications like Adobe Photoshop, just as on a physical desktop. This is ideal for organizations needing software that requires installation.
Amazon Workspaces Web provides a secure Chromium web browser, allowing companies to set rules for website access, bookmarks, extensions, and more. It restricts staff to necessary web applications, eliminating redundant or insecure ones, ideal for companies relying on web-based tools.
In terms of pricing, there is also a significant difference between the two. Generally, Azure Virtual Desktop is estimated at $40.00 per user per month. Conversely, the Amazon Workspaces Web comes at a cost of just $7 per user per month.
Security, HIPAA and PCI compliance
Both Azure Virtual Desktop and Amazon Workspaces Web offer similar accessibility and security controls for remote infrastructure management and convenience, while ensuring compliance with HIPAA and PCI regulations.
It is very important to note that Amazon Workspaces Web has a pretty annoying limitation. You may only configure one Web Portal per Region and can only have 25 simultaneous user sessions per portal. So if you are a large organization requiring more than 25 users connected at a time, you will need to configure several web portals, one per region or start a new AWS account for each of the 25 user blocks. Or simply said, Amazon Workspaces Web is not for you and your best option is Azure Virtual Desktop. Here is a list of all Amazon Workspaces Web limitations.
| Name | Default | Description |
|---|---|---|
| Number of maximum concurrent sessions per web portal | Each supported Region: 25 | The maximum number of concurrent sessions for a Amazon WorkSpaces Web portal in this account in the current Region. |
| Number of web portals | Each supported Region: 1 | The maximum number of Amazon WorkSpaces Web portals in this account in the current Region. |
| Number of browser settings | Each supported Region: 3 | The maximum number of Amazon WorkSpaces Web browser settings in this account in the current Region. |
| Number of certificates per trust store | Each supported Region: 100 | The maximum number of certificates in an Amazon WorkSpaces Web trust store in this account in the current Region. |
| Number of identity providers per web portal | Each supported Region: 1 | The maximum number of identity providers for an Amazon WorkSpaces Web portal in this account in the current Region. |
| Number of network settings | Each supported Region: 3 | The maximum number of Amazon WorkSpaces Web network settings in this account in the current Region. |
| Number of trust stores | Each supported Region: 3 | The maximum number of Amazon WorkSpaces Web trust stores in this account in the current Region. |
| Number of user settings | Each supported Region: 3 | The maximum number of Amazon WorkSpaces Web user settings in this account in the current Region. |
As a BPO company, we focused on regulatory compliance, simplifying administration, and building scalable regional infrastructure at an affordable price. Our users don’t run intensive applications, they only access client systems for tasks like customer service or account management.
We found that Azure Virtual Desktop and Amazon Workspaces Web meet our needs better than Windows 365 Cloud PC. These platforms are affordable, provide essential functions, and help us deliver vital services effectively.
Azure Virtual Desktop Step by step setup
If you have not yet created your Microsoft Azure account, start your trial here.

Step 1: Active Directory (Microsoft Entra ID)
Active Directory is required to manage devices and users in Azure. You can choose between traditional Active Directory or the simpler Microsoft Entra ID, which doesn’t need additional device setup. I prefer Microsoft Entra ID for its ease of use.
For more on Microsoft Entra ID, a powerful user and device management system, see the introduction below.
To continue setup, use the “Search resources, documents, etc.” box at the top of the Azure Portal to find “Microsoft Entra ID.” Create a new Entra ID, using your domain as the primary domain, and add a TXT record to your domain’s DNS for verification.
I prefer using a subdomain (e.g., local.domain.com) to keep virtual desktop users directed to the website, not the Active Directory domain, and to isolate Entra ID from the main site.
After setting up Microsoft Entra ID, it’s wise to add a second internal admin user. If you lose access to your credentials or MFA, having another admin ensures you can still access the account.
- While inside Microsoft Entra ID, select users → create.
- Select Internal user.
- Enter name, email and other contact information you would like to provide.
- In Assignments select “add role” and add the user to Global Administrator role.
- in “Search resources” text box on top of the Azure Portal search and navigate to Azure Subscriptions.
- Select your subscription, select Access Control(IAM)
- Select Add → Role assignment → Privileged administrator roles
- Search for “Owner” and select it
- Switch to “Members” → Select Members, find the new user and add it.
- Select “Allow user to assign all roles” in Conditions.
- The click on “Review + assign” to complete the process.
You may now switch to groups and create all necessary groups for your organization. For example in our organization we had to create two groups:
HelpSquad-Agent to be used to assign CSRs(agents) to (low level of permissions)
HelpSquad-Supervisor to be used to assign shift supervisors to with higher level of permissions such as agent monitoring tools, desktop shadowing, access to clipboard, printers, etc.
Step2: Create resource group
A resource group is a container for organizing related Azure resources, like virtual machines and storage accounts, for a specific project or environment. It’s similar to a file folder in Windows. Within a resource group, you can manage access, apply policies (e.g., region restrictions), and track costs.
- Search and navigate to “Resource Groups”.
- Create a new resource group.
- I like to name resources in Azure by prefixing them with an abbreviation of the item. For example I would name resource group “RG-COMPANYNAME”. This way I can always easily identify each resource by its name.
- To create resource group select active Azure subscription, name it and select the region. I would create everything in a region located as close as possibly to your end users. So if the users accessing your Azure implementation are all residing in New York for example, you will need to select East US region. Though resource group location is not as important as Host Pool and Virtual Machine Session Host (setup later), I still usually create everything in the same region.
- Once created, go to resource and select Access Control (IAM)
- Select Add → Role Assignment
- Select “Virtual machine User Login”
- In “Members” click on “Select Members” and select all groups you setup in Microsoft Entra ID.
- Select “Review and Assign” to complete the assignment.
- Select “Overview” within the resource group.
- In resources find resource with the type “Application Group” suffixed with DAG i.e. HS-ASIA-DAG. Select it.
- On Assignments click “Manage”
- Click “Add” and add the Microsoft Entra ID group(s) you created earlier.
Quick explanation of the Application Group:
An application group in Azure Virtual Desktop defines which apps are available to users and is best managed by assigning security groups. It streamlines app delivery and desktop management. The default “*-DAG” group, created with the Host Pool, is used for virtual desktop access.
Step 3: Application Group
For remote app streaming we need to create a second application group of Type “RemoteApp” to provide applications for streaming.
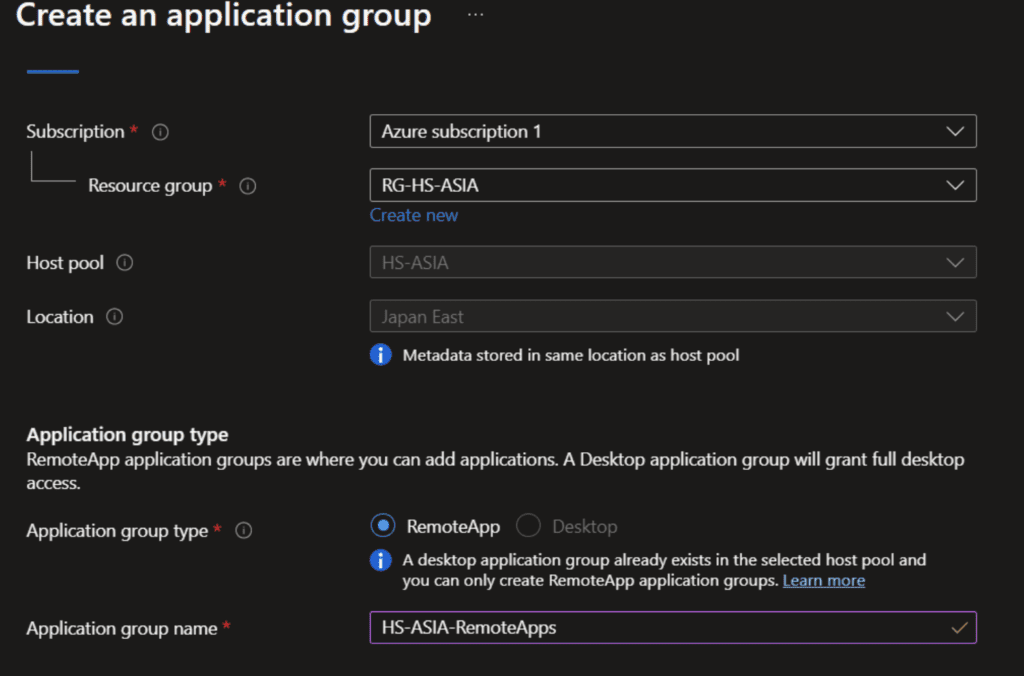
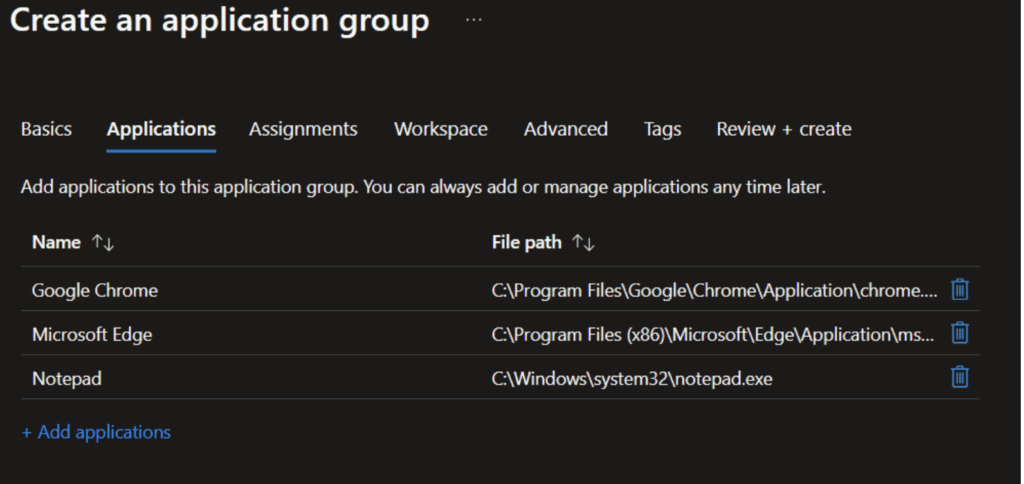
Application streaming is like Netflix—RemoteApp streams applications to your desktop instead of movies to your TV. This was ideal for us, as we wanted to restrict some users to specific apps without full desktop access. After basic application group setup, we can add existing apps on the virtual machine for streaming.
In the list of applications all applications for streaming are listed.
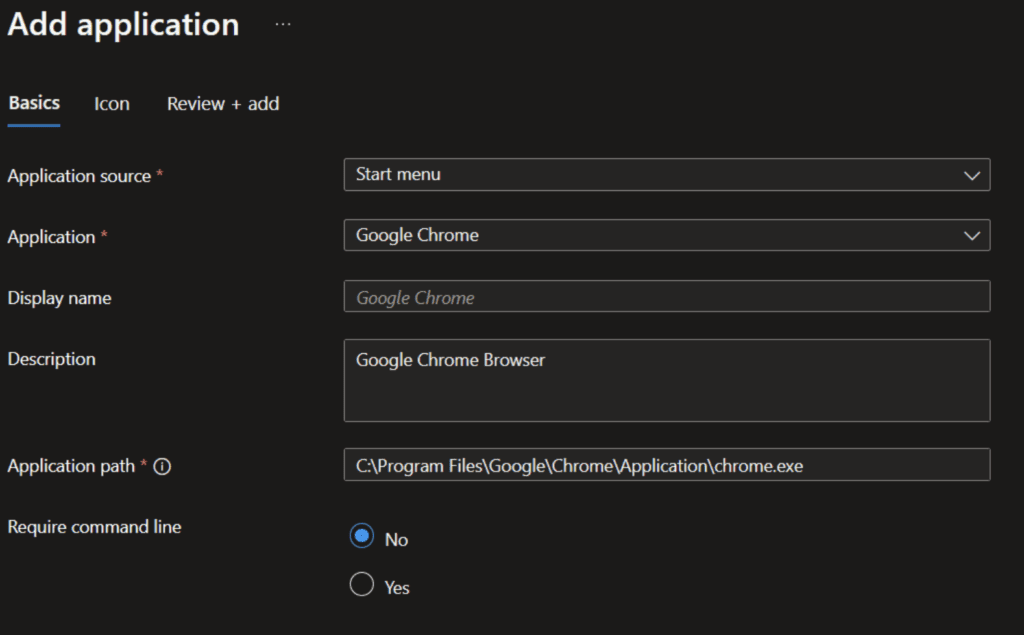
In the next step we can decide which security group will grant access for the app streaming.
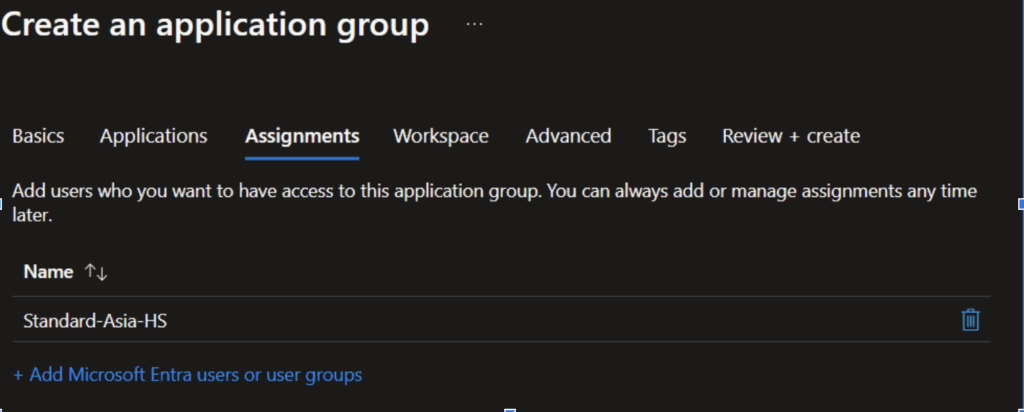
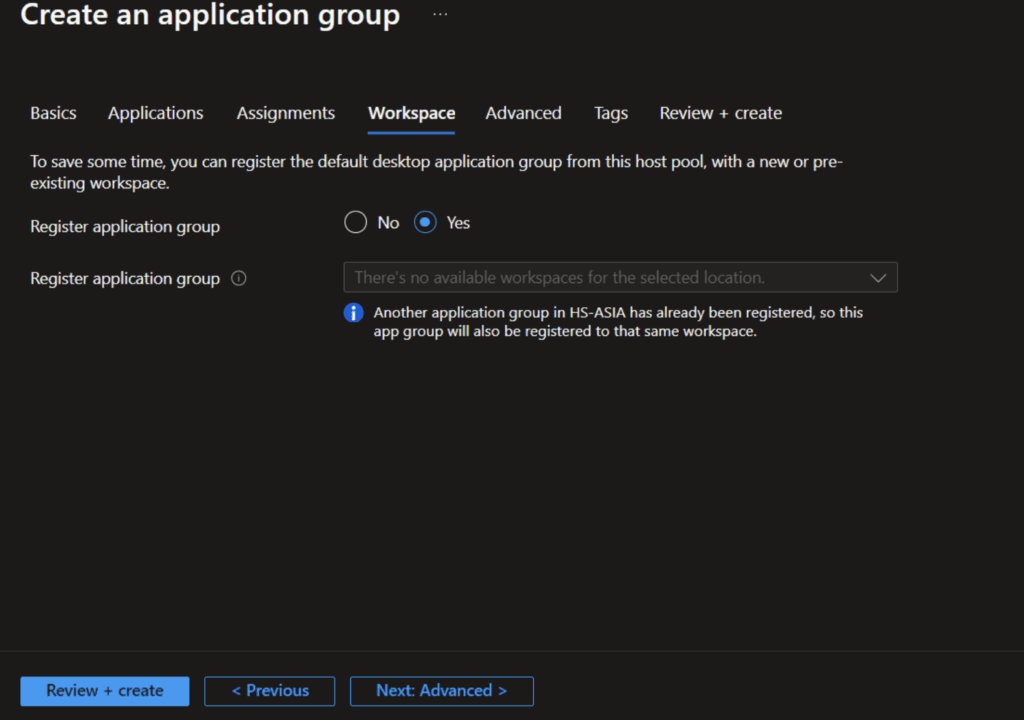
By default, the remote app streaming group will be mapped to the existing workspace where the Application Group “*-DAG” is located.
After the synchronization of the workspace with the new application in the remote desktop app the application on the session hosts can be used for app streaming.

In the taskbar a new icon of the application will be displayed for a better overview which application is local and which is streamed. Note a small remote desktop icon on streamed applications.

Step 4: Virtual Network
Azure Virtual Network is the foundation for your private network in Azure. Azure Virtual Network (a service instance) provides ability to virtualize multiple types of Azure resources, connect to the internet, and, optionally, on-premises resources.
- Search portal and navigate to Virtual Networks
- Create new Virtual network
- Place the new virtual network witih the Resource Group you created above
- Name it with vnet prefix i.e. vnet-asia.
- Select correct region you decided on to keep everything close to your end user.
- You do not have to change anything on the Security Tab. Leave defaults.
- On the IP addresses tab, delete the default subnet.
- Create two new subnets with the following IP address blocks:
Subnet-A : 10.0.1.0/24
Subnet-B : 10.0.2.0/24
Think about subnets as IP address area for the virtual machines. For example Subnet-A machines can communicate with each other to share network resources but not with Subnet-B PCs. This is so you can assign Virtual Desktops to different subnets when you need them to be isolated from each other. - Click “Review and Create” button to create your virtual network.
By the way, you can check your own subnet by entering your public IP address into a subnet calculator. This also shows you all other IP addresses in the same subnet.
Step 5: Create and configure Host Pool
Azure Host Pool represents a collection of session hosts (Virtual Machines) that deliver desktops or applications to end-users. Host pools allow you to scale and manage virtual desktop infrastructure efficiently.

In the top bar search “Azure Virtual Desktop” and select it.
Click “Create a host pool” button.
Select active subscription, resource group you created in the previous step and name your host pool i.e. “HP-COMPANYNAME-USERTYPE”. Each host pool will have its own set of user permissions, so you will have a host pool created for each user type. For example for your standard users, supervisors, admins, etc.
Select Region, leave validation environment as “No”, preferred app group type as “Desktop” and select “Pooled” for host pool type.

A host pool can be either Personal (dedicated desktops for each user) or Pooled (shared desktops). Since my setup is for customer service agents and Virtual assistants using basic web applications, I chose a Pooled setup, which is more cost-effective. I set a max session limit of 10 users per desktop. If an 11th user connects, Azure automatically creates a new desktop, each with a 10-user limit, handling load balancing automatically.
Now with Basic setup of the host pool completed, we move to “Virtual machines” tab.
Name prefix I usually provide as regionname-vm, i.e. asia-vm.
Select virtual machine location. Again this should be the closest to your end users.
The VM image you select is very important. It depends on how many users will be accessing your VMs at the same time.
You can always upscale or downscale your VMs.
Select Number of VMs for this host pool. Let’s start with 2 for now. As the number of users grows for your organization, all you will need to do is increase this number to provide more VMs within your host pool to service more sessions.


For OS Disk Type select Premium SSD.
Select Virtual network you created above.
Select one of the Subnets you created above.
For Availability options select “No infrastructure redundancy required”
For Domain to join select Microsoft Entra ID.
Provide username and password for virtual machine administrator account. Do not worry about forgetting the password, you may always reset it. This account will be able to login and administer all of the VMs in this host pool.

Next, we go to Workspace tab.
A workspace is a container for Azure Monitor and Azure Security Center data. It provides a centralized place to collect, analyze, and visualize telemetry data from various Azure resources. Workspaces are used for monitoring, logging, and security insights. Each workspace have a different set of desktops and applications for the group of users.

Select Yes for Register desktop app group
Create new workspace. Prefix the name with WS

Do not change anything on Advanced tab and just create the host pool.
It usually takes about 15 minutes to create a host pool.
Once the host pool is created, go to resource and select “RDP Properties” within the left menu.
This is where we control what users can and cannot do on the Virtual Desktop, such as whether they are able to access local drives, printers, clipboard, microphone, camera, etc. This was one of the most important vdi configurations for our use case especially when we serve clients requiring HIPAA, PHI and PCI compliance.
Select Advanced and copy pate the following script.
targetisaadjoined:i:1;drivestoredirect:s:*;audiomode:i:0;videoplaybackmode:i:1;redirectclipboard:i:1;redirectprinters:i:1;devicestoredirect:s:*;redirectcomports:i:1;redirectsmartcards:i:1;usbdevicestoredirect:s:*;enablecredsspsupport:i:1;redirectwebauthn:i:1;use multimon:i:1You may also configure all of the redirection manually by opening “Device Redirection” tab within Host Pool RDP Properties.
Most of the redirections can be configured manually by changing settings within Device Redirection tab but some will require scripting which you can apply within Advanced tab. More information may be found at Microsoft portal Remote Desktop Protocol properties for a host pool.
Once finished configuring RDP Properties you may click “Save” button.
Step 6: Azure Storage Account
A storage account provides scalable and secure storage for data in Azure. It supports different storage services like blobs, files, tables, and queues. Storage accounts are essential for storing VM disks, backups, and roaming profiles for Azure Virtual Desktop. They can also be configured as storage for backups, making them a versatile and secure option for both user data and system recovery scenarios. Each user profile will be stored in a file share inside a storage account. For roaming profiles fslogix is used in azure virtual desktop which allows to store personal data of each user in an external location. When a user is assigned to different virtual machines the profile will be mapped during the connection to the session host. Another way to say it, if a user accesses a Virtual Desktop and signs in to an application which stores his/her credentials, no matter which desktop user will end up on going forward his/her profile will “roam” to that desktop and so will his/her stored credentials for said app.
Navigate to Storage Accounts and click on “Create” button.
Select Resource Group created earlier.
Select the region selected earlier.
Name storage account with sa prefix, i.e. saasia
Select Standard for performance.
For redundancy select “Local”

Move to the Advanced Tab.
Select Large file share storage accounts do not have the ability to convert to geo…” and move to “Networking” tab.
Leave defaults on the “Networking” tab and move to “Data protection” tab.
Leave defaults and finish created your Storage Account.
Once the Storage account is created open it by selecting “Go to resource”
Select “Access keys” and copy the first key and save it elsewhere, like notepad. (you will need it later for a PowerShell script we will need to execute on VMs to enable profile roaming)
Select “File shares” and create new file share.
Name it “profiles”
Review and create the file share.
Step 7: Test Connection to Azure Virtual Desktop Hostpool via Webportal or RDP Application
You are ready to give your Azure Virtual Desktop a test now.
Create a test user in Microsoft Entra ID and assign it to one of the groups you created earlier.


There are two ways users may access the virtual desktop.
Via RDP Client. You can download the RDP client for the specific devices:
You may find an IP Address to use to connect to the virtual machine by viewing Virtual Machine in the Azure Portal.
To access the hostpool and the assigned workspace you can also connect via browser over the following url: https://client.wvd.microsoft.com/arm/webclient/
You may compare the features of the Remote Desktop clients when connecting to Azure Virtual Desktop.
When you use the Web Browser to connect to the virtual desktop you will notice the “Access to local resources” popup. All of the redirections you allowed for the host pool in RDP Properties will show here, and the ones you disabled will not be available at all for the user.

Step 8: Golden Image
Azure provides the possibility to capture the status of a virtual machine by creating a template of this computer and saves it into a azure compute gallery. The Image(Golden Image) created can be used for other virtual machines or specific for the use of session hosts in the azure virtual desktop.
You may store several golden images and version them.
An image version creates a VM using a gallery, allowing multiple versions to fit different needs. It generates new disks for each VM and can be reused. Pre-installed vdi configurations can be included.
An image definition in a gallery specifies the image’s details, like OS type (Windows or Linux), release notes, and memory requirements, defining a specific image type.
To setup a golden image we need to first search and navigate to Azure Compute Gallery.
The Azure Compute Gallery, simplifies custom image sharing across your organization. Custom images are akin to marketplace images, but you create them yourself. You can create images from various sources, including VMs, VHDs, snapshots, managed images, or other image versions.
- Click Create Azure Compute Gallery
- Select your resource group
- Name it with “acg” prefix.
- Skip other tabs and create Azure Compute Gallery.
We can now work on creating a Golden Image to be stored in Azure Compute Gallery. The virtual machine we will use as a golden image must be created outside of the host pool. Please follow the steps below:
- Search portal and navigate to “Virtual Machines”.
- Click Create → Virtual Machine
- Select Resource Group
- Availability “No infrastructure redundancy required”
- Name your virtual machine.
- Select an Image OS you would like to use.
- Select the size for your VM
- Create administrator account username and password
- Skip all the other tabs and create the virtual machine.
Connect to the machine using RDP client.
Install all applications you would like your users to have access to. For example for our purpose we installed Zoom Application and Chrome browser since all VAs use Zoom for meetings and phone and Chrome browser for web apps. This way any time in the future we deploy a new virtual machine it will have those applications pre-installed. You may also configure other registry edits, etc. to customize the machine the way you want all your virtual machines to be configured going forward.
You will need to also open command prompt on the virtual machine (search windows for CMD, right click and open as Administrator) then execute the following command:
C:\Windows\system32\sysprep\sysprep.exe /generalize /shutdown /oobeThis command with generalize our image, remove all personal information, user folders and vanilla box it.
Once the process of generalization is complete you will be automatically disconnected.
Open Virtual Machine resource in Azure portal and click “Capture” button on top.
Select the region and azure compute gallery you created earlier.
Create new Image Definition and give version to your new image. Again, always give names to resources that are self explanatory for you and your other Azure admins.
Complete image creation by selecting “Create” button.

Step 9: Creating VMs from Golden Image
Now that you have Golden Image created with all of the applications and vdi configurations your users require, let’s stand up couple VMs from it for users to use.
- Navigate to the Host Pool you created earlier.
- Click on “Total Machines”
- Click “Add” to add Virtual Machines to your host pool
- Switch to “Virtual Machines” tab
- Select “No infrastructure redundancy required” in Availability Zones
- Now to select the image, click “see all images” → “shared images”
- You will see your Golden Image displayed, select it
- Select number of VMs you would like to create from the image.
- For Domain select “Microsoft Entra ID”
- Provide administrator username and password for your VMs
- Click on “Create” button to deploy new virtual machines from the golden image
When you delete VMs, make sure to delete them from Microsoft Entra ID → Devices and Host Pool → Session Hosts as the metadata for deleted machines remains there.
Step 10: Configure roaming profiles
Microsoft’s roaming profiles give IT administrators a basic option to provide users with their personal settings and data on any device or virtual desktop connected to the corporate network.
- Navigate and open a Virtual Machine you would like to configure profile roaming for within Azure Portal
- Select “Run Command”
- Select “Run PowerShell Script”
- Paste the following script and Run it. (remember to replace STORAGEACCOUNTNAME and KEY with attributes of your storage account you created above)
cmd.exe /c "cmdkey /add:STORAGEACCOUNTNAME.file.core.windows.net /user:localhost\STORAGEACCOUNTNAME /pass:KEY"
New-Item -Path "HKLM:\SOFTWARE" -Name "FSLogix" -ErrorAction Ignore
New-Item -Path "HKLM:\SOFTWARE\FSLogix" -Name "Profiles" -ErrorAction Ignore
New-ItemProperty -Path "HKLM:\SOFTWARE\FSLogix\Profiles" -Name "Enabled" -Value 1 -force
New-ItemProperty -Path "HKLM:\SOFTWARE\FSLogix\Profiles" -Name "VHDLocations" -Value "\\sahsasia.file.core.windows.net\profiles\profiles" -force
New-ItemProperty -Path "HKLM:\SOFTWARE\FSLogix\Profiles" -Name "ConcurrentUserSessions" -Value 1 -force
New-ItemProperty -Path "HKLM:\SOFTWARE\FSLogix\Profiles" -Name "DeleteLocalProfileWhenVHDShouldApply" -Value 1 -force
New-ItemProperty -Path "HKLM:\SOFTWARE\FSLogix\Profiles" -Name "FlipFlopProfileDirectoryName" -Value 1 -force
New-ItemProperty -Path "HKLM:\SOFTWARE\FSLogix\Profiles" -Name "IsDynamic" -Value 1 -force
New-ItemProperty -Path "HKLM:\SOFTWARE\FSLogix\Profiles" -Name "KeepLocalDir" -Value 0 -force
New-ItemProperty -Path "HKLM:\SOFTWARE\FSLogix\Profiles" -Name "ProfileType" -Value 0 -force
New-ItemProperty -Path "HKLM:\SOFTWARE\FSLogix\Profiles" -Name "SizeInMBs" -Value 5000 -force
New-ItemProperty -Path "HKLM:\SOFTWARE\FSLogix\Profiles" -Name "VolumeType" -Value "VHDX" -force
New-ItemProperty -Path "HKLM:\SOFTWARE\FSLogix\Profiles" -Name "AccessNetworkAsComputerObject" -Value 1 -force
The above PowerShell command will utilize FSLogix to configure Azure Storage to be used for user roaming profiles on Virtual Desktops.
Repeat the step for all VMs you would like to roam user profiles.
Step 11: AutoScale setup for Azure Virtual Desktop
Autoscale is Azure Virtual Desktop’s native scaling service that turns VMs on and off based on the capacity of the host pools and the scaling plan schedule you define.
Our BPO runs 4 shifts of agents, each having different number of agents and workloads. For example we start our morning with hundreds of agents working, then gradually go down to less than 100 agents overnight working their shift.
Without AutoScale we would need to either run hundreds of VMs continuously or have IT Admins turn VMs off and on depending on how many agents are active at the moment. Having in mind that every hour each VM is running we incur costs, we needed a solution and having a dedicated IT admin manually managing VMs was out of question.
To setup Azure Virtual Desktop AutoScale first head to subscriptions and add a Custom Role in Access Control (IAM) section.

In JSON add this snippet.
{
    "properties": {
        "roleName": "Desktop Virtualization Autoscale",
        "description": "Azure Virtual Desktop Autoscale Role",
        "assignableScopes": [
            "/subscriptions/<SubscriptionID>"
        ],
        "permissions": [
            {
                "actions": [
                    "Microsoft.Compute/virtualMachines/deallocate/action",
                    "Microsoft.Compute/virtualMachines/restart/action",
                    "Microsoft.Compute/virtualMachines/powerOff/action",
                    "Microsoft.Compute/virtualMachines/start/action",
                    "Microsoft.Compute/virtualMachines/read",
                    "Microsoft.DesktopVirtualization/hostpools/read",
                    "Microsoft.DesktopVirtualization/hostpools/write",
                    "Microsoft.DesktopVirtualization/hostpools/sessionhosts/read",
                    "Microsoft.DesktopVirtualization/hostpools/sessionhosts/write",
                    "Microsoft.DesktopVirtualization/hostpools/sessionhosts/usersessions/delete",
                    "Microsoft.DesktopVirtualization/hostpools/sessionhosts/usersessions/read",
                    "Microsoft.DesktopVirtualization/hostpools/sessionhosts/usersessions/sendMessage/action"
                ],
                "notActions": [],
                "dataActions": [],
                "notDataActions": []
            }
        ]
    }
}
Without adding this custom role you will not be able to configure AutoScale.
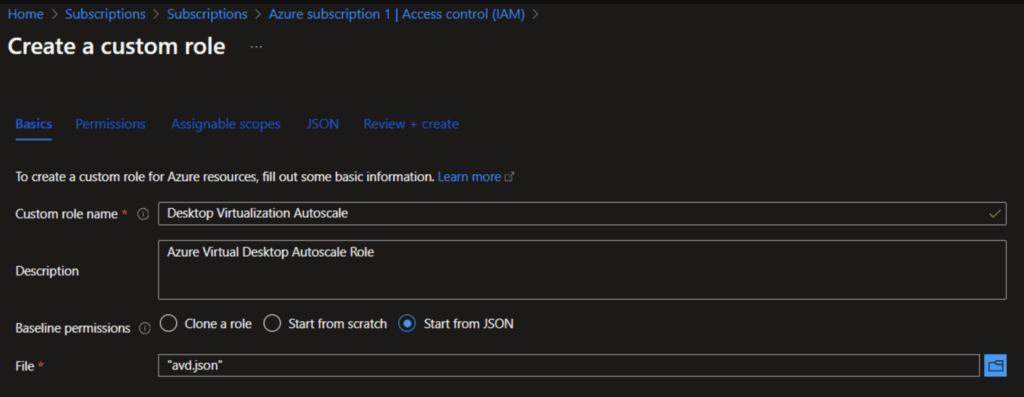
In the Section “Assignable scopes” we need to select our subscription so that the AutoScale will be active for all host pools

After we created the new custom role for AutoScale we need to assign this permission the azure virtual desktop service in azure.

Select the Azure Virtual Desktop Service Account
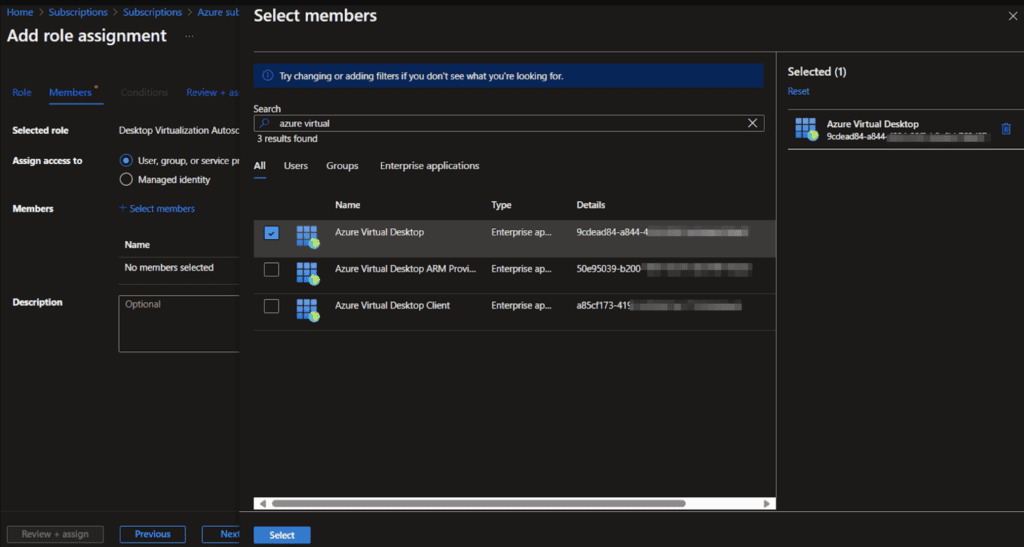
After the permission is available, we need to create a scaling plan on the Host Pool section in the azure portal.
In the search bar type “Azure Virtual Desktop” and select “Scaling Plans” and then “Create”
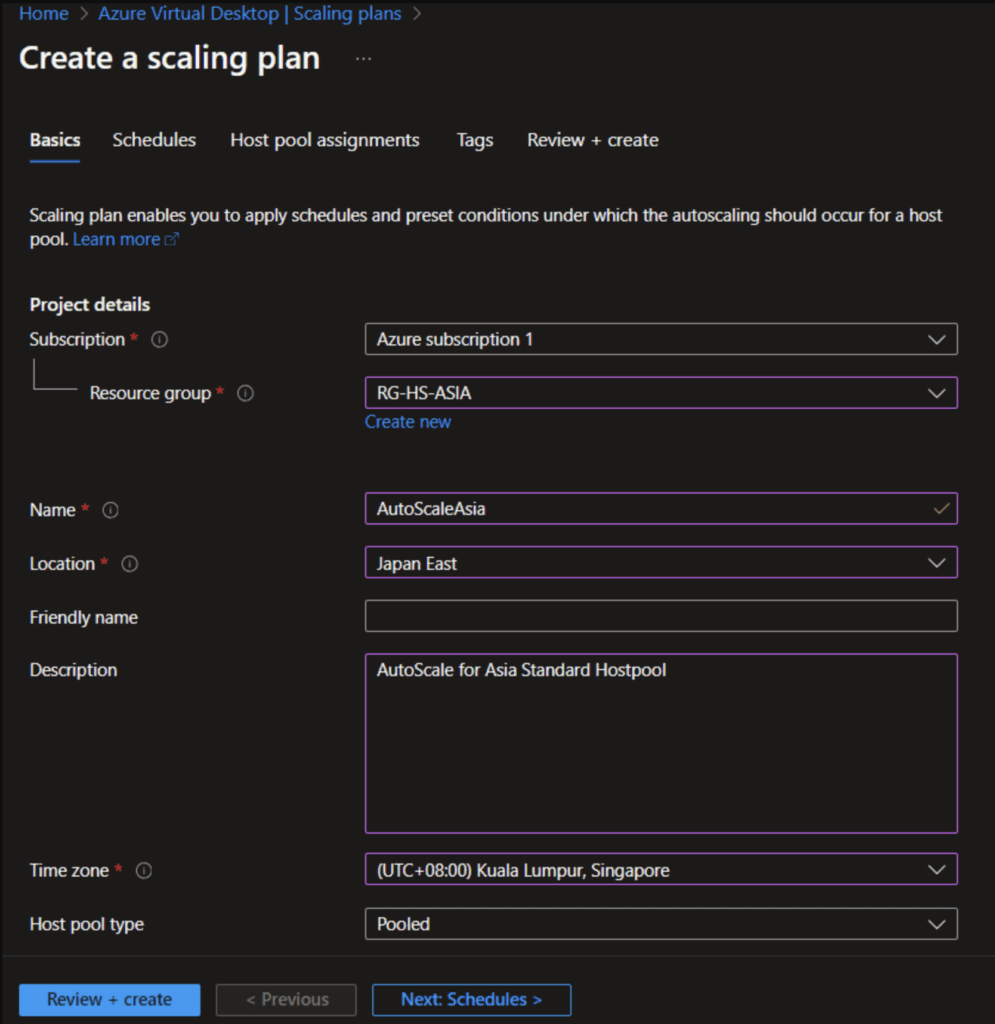
In the first section we need to configure the basics like name and Time zone for the scaling plan. After the basic configuration we need to configure the schedule.
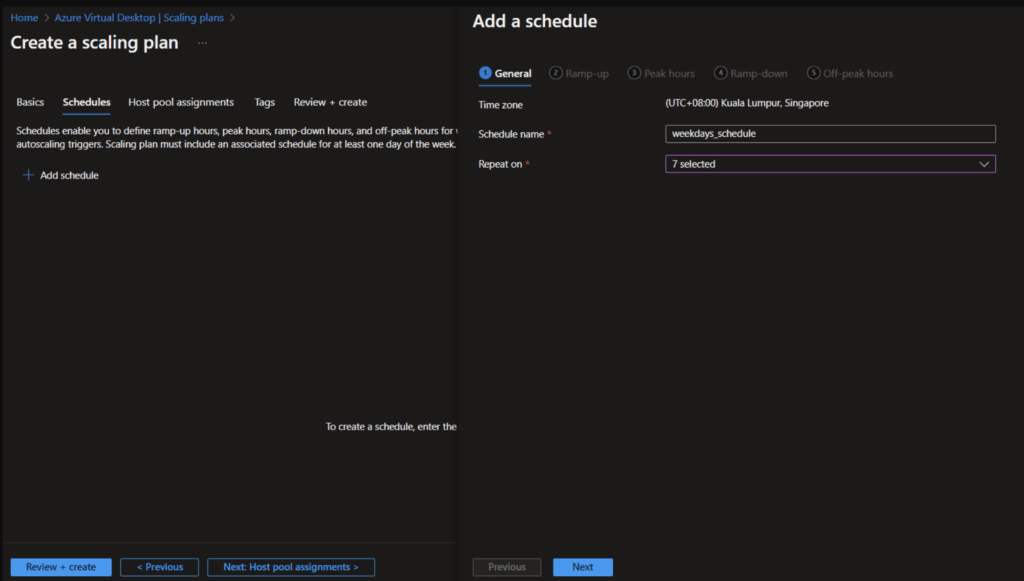
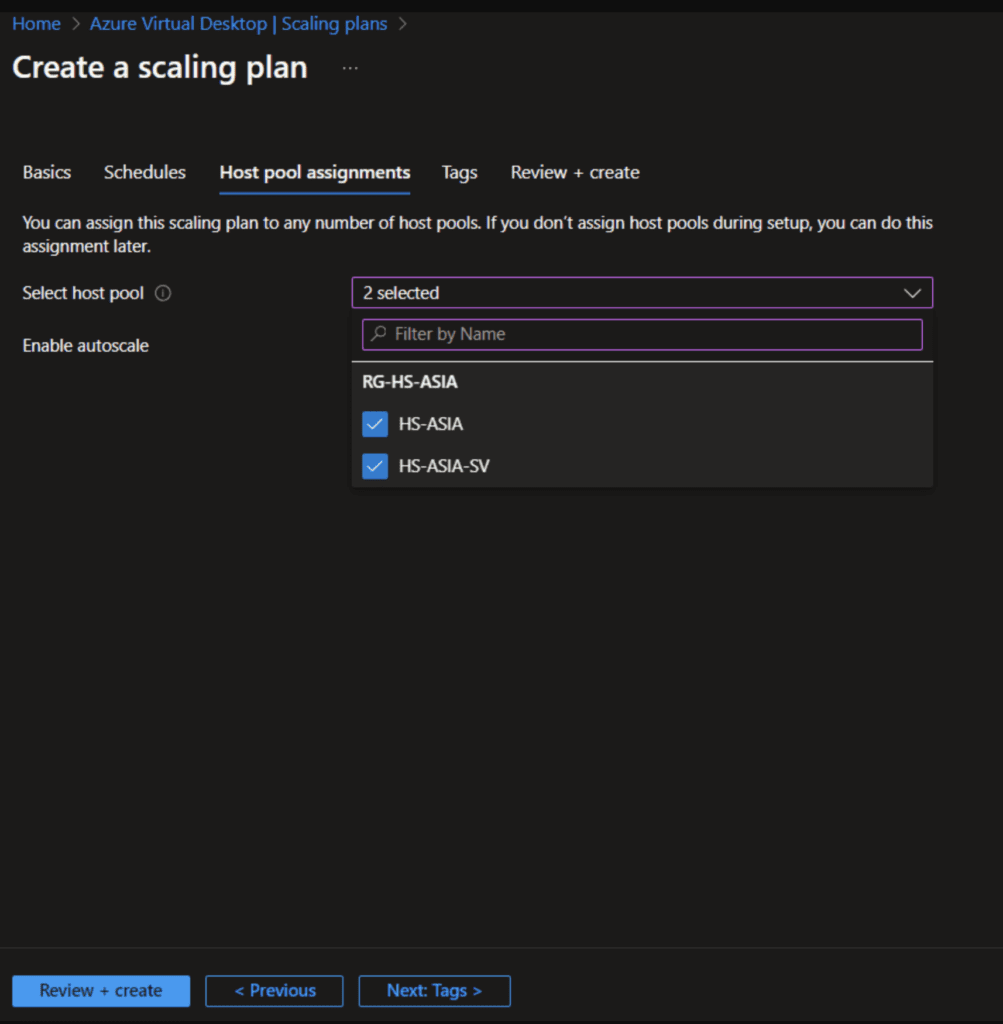
After the Scaling we need to assign the new scaling plan to our host pools
Go ahead and complete creation of the scaling plan.
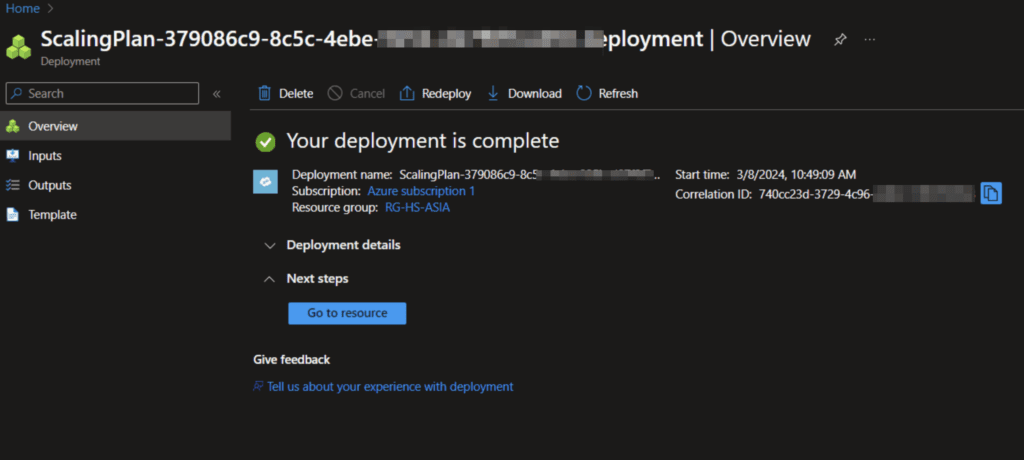
We Can view or modify our existing Scaling plans in the “Scaling plans” Section under “Azure Virtual Desktop”.
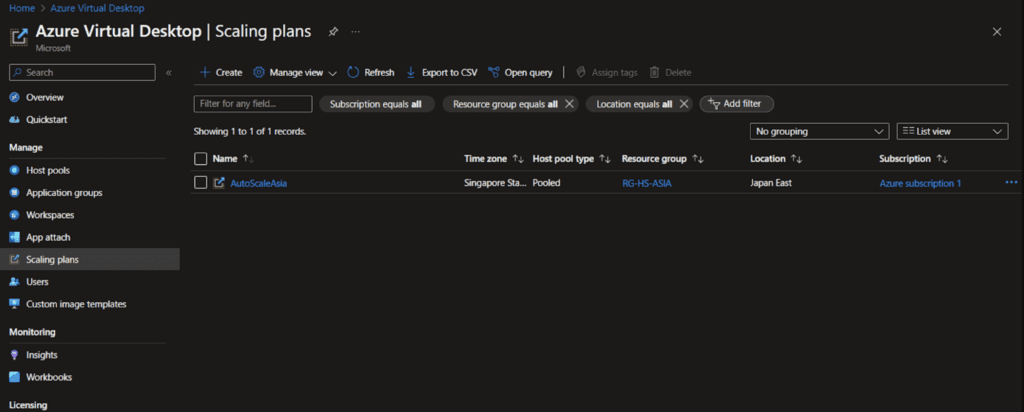
Optional Azure Virtual Desktop setup for BPOs
We had two more requirements from our management to accomplish:
- Ability to monitor agents in stealth mode. Meaning for supervisor to be able to monitor agent’s remote desktop session at any time and without agent knowing he/she is being monitored.
- Record and report on agent access times. This is in relation to simplify workforce management and to quickly report on how many hours agents worked and whether that start and end their shifts on time.
To solve both we could use Teramind Behavior Analytics system. It is inexpensive and very powerful. It provides everything an organization needs to Capture, Analyze and Control User Desktop Activity For Any Use Case.
But because we had a bunch of nerds on our team we decided to use RDP Shadow and Windows Evens to solve the two.
For RDP shadow to function properly same local administrator (username/password) must existon each virtual machine/session host.
You will also need to execute this PowerShell script to allow RDP Shadow with full control:
reg add "HKEY_LOCAL_MACHINE\SOFTWARE\Policies\Microsoft\Windows NT\Terminal Services" /v Shadow /t REG_DWORD /d 2
You also need to understand these windows commands:
qwinstato get the user´s session id (can be run on remote powershell or azure portal on machine -> run command -> powershell script
Finally here’s the command to RDP shadow a virtual machine:
runas /user:<user> "C:\Windows\System32\mstsc.exe /shadow:<session> /v:<ipaddress> /control /noConsentPrompt"<user> needs to be the local administrator of the virtual machine
<session> needs to be the session id of the user /control and to which you have admin permission
<ipaddress> IP Address of the remote machine you would like to shadow.
/noConsentPrompt allow shadow without user interaction.
Use Run Command inside the Azure Portal to run a powershell script
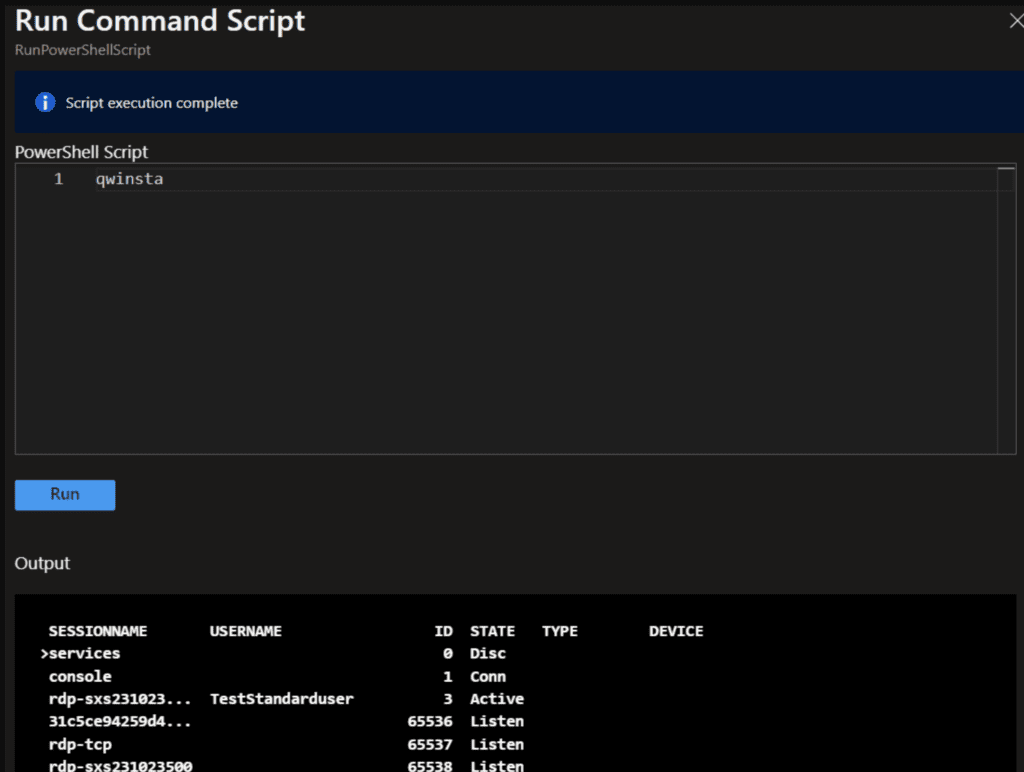
To get the IPv4 Adress you can also run ipconfig or get the IPv4 from the portal within the section “virtual machine”.
After the session ID and IPv4 address we must run cmd with administrative privileges on the Supervisor Virtual Desktop to be able to monitor other users session. Enter the password for the local machine to open the connection.

After we enter the credentials for the local admin a new window with the session of the user will pop up.
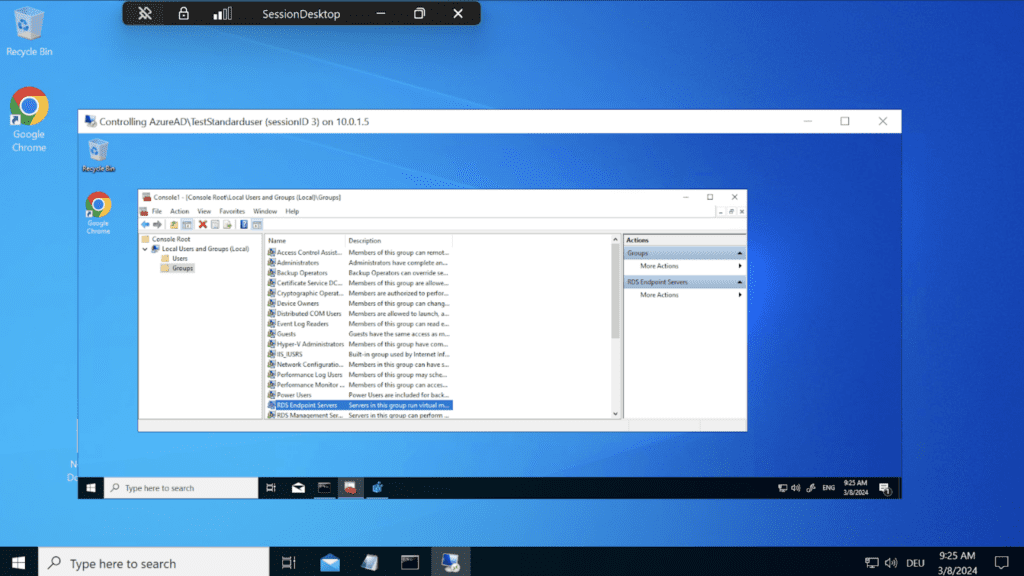
To solve the requirement of reporting back to the main office log in and log out events for our agents we used Event Viewer Task scheduler to react and report login and logout events.
<QueryList>
  <Query Id="0" Path="Microsoft-Windows-TaskScheduler/">
    <Select Path="Microsoft-Windows-TaskScheduler/Operational">
     *[EventData[  (Data='\MoveEDIFiles')]]
      and
     *[System[(EventID=101 or EvendID = 103 or EventID = 104 or EventID = 130 or EventID = 204 or EventID = 205 or EventID = 305)]]
    </Select>
  </Query>
</QueryList>
We will be publishing a new article on how to accomplish this easily.
Amazon Workspaces Web Step by step setup
If you have not yet created your AWS account, start your trial here.
Step 1: Configure VPC
Amazon Virtual Private Cloud (Amazon VPC) gives you full control over your virtual networking environment, including resource placement, connectivity, and security.
Login to the AWS web console to start the creation of a new VPC. https://console.aws.amazon.com/
Enter the VPC service in the search field inside the aws console and click create new VPC.
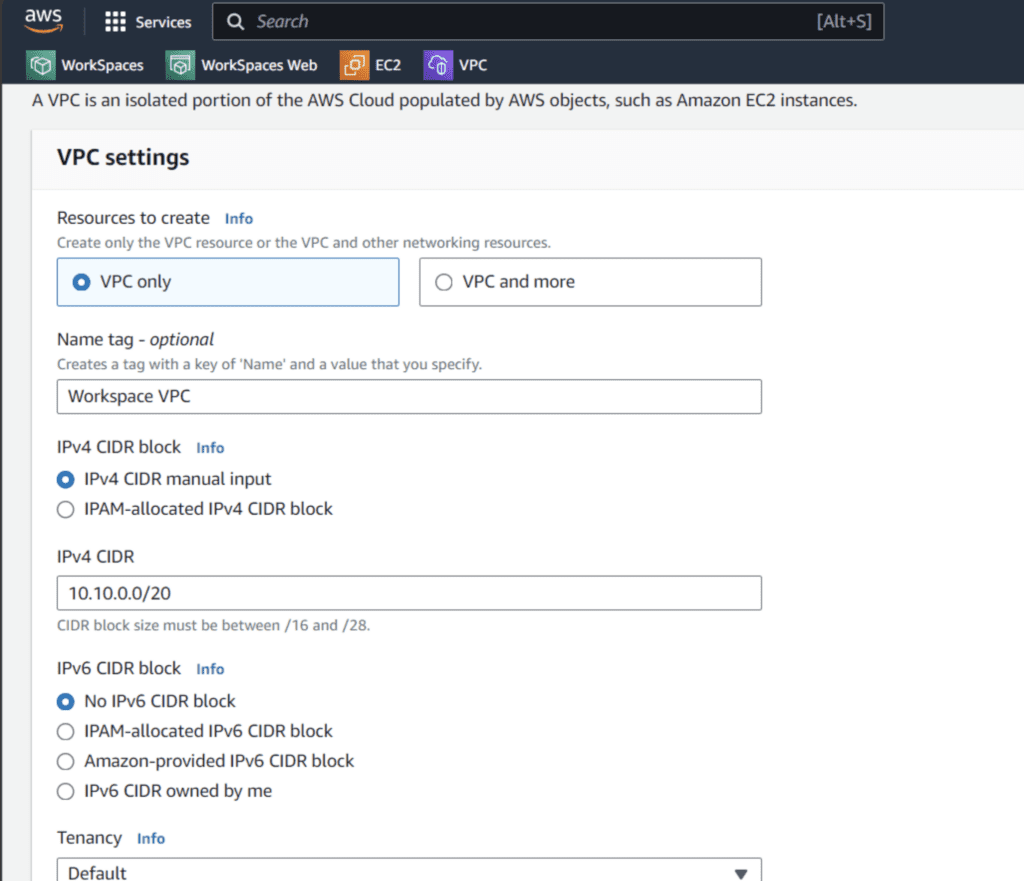
Choose VPC only and user for the IPv4 CIDR the address 10.10.0.0/20. In the Tag section you can set a name for the VPC.
Create two private subnets for the VPC
After the Creation of the VPC we need to create two private subnets and one public subnet for the requirements for aws workspace web.
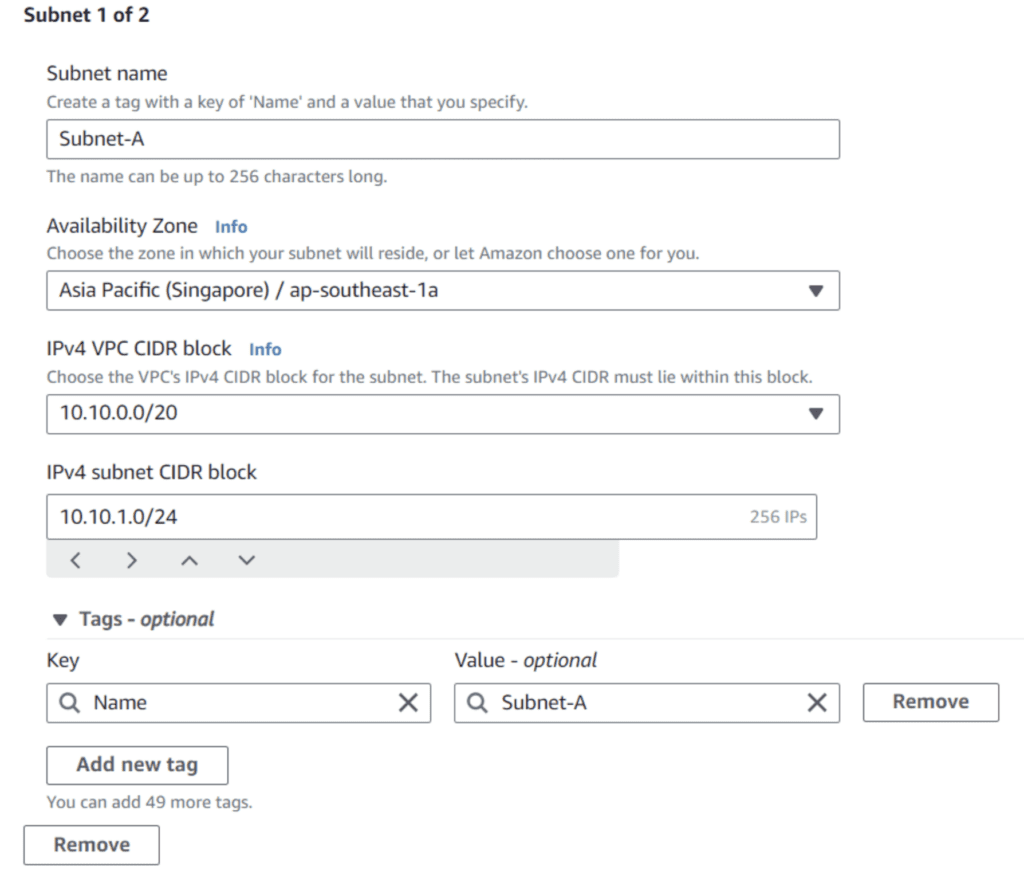
Create a private Subnet-A with IPv4 CIDR 10.10.1.0/24
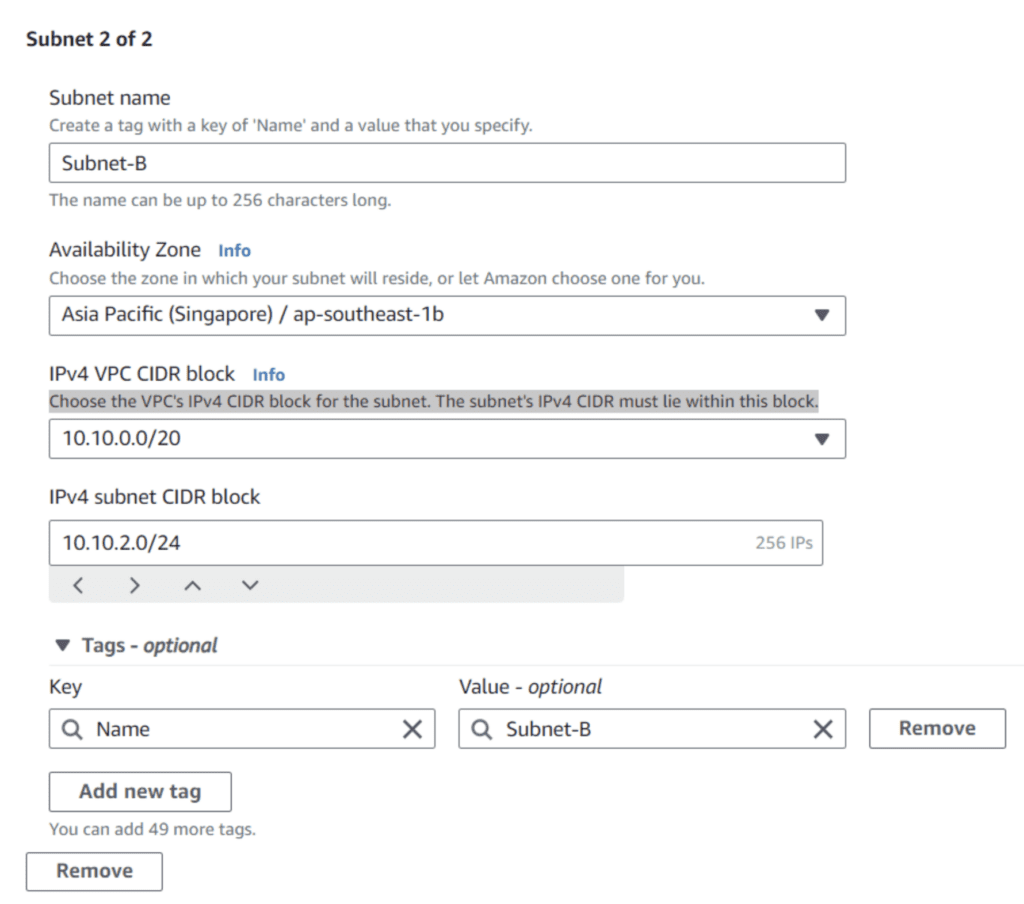
Create a private Subnet-B with IPv4 CIDR 10.10.2.0/24.
The third subnet will be a public subnet for internet access with an internet gateway where the nat-gateway can be routed to.
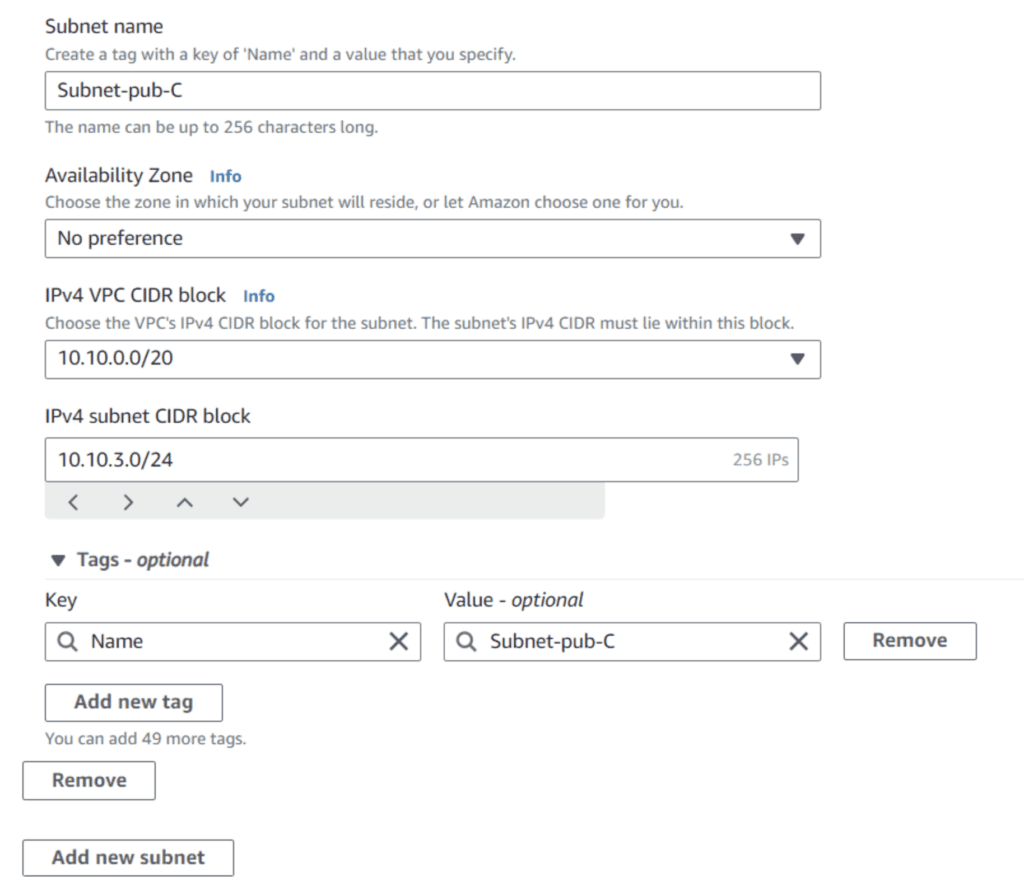
For the third pub.ic subnet use the CIDR 10.10.3.0/24
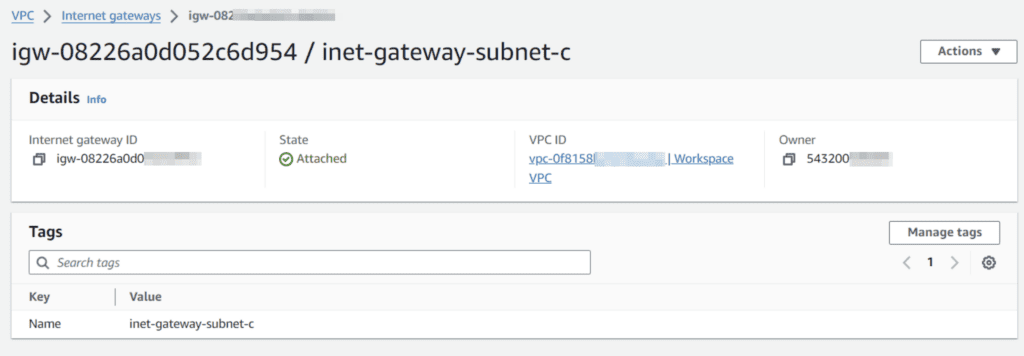
After creation of three subnets create an internet gateway for subnet pub c for public internet access.
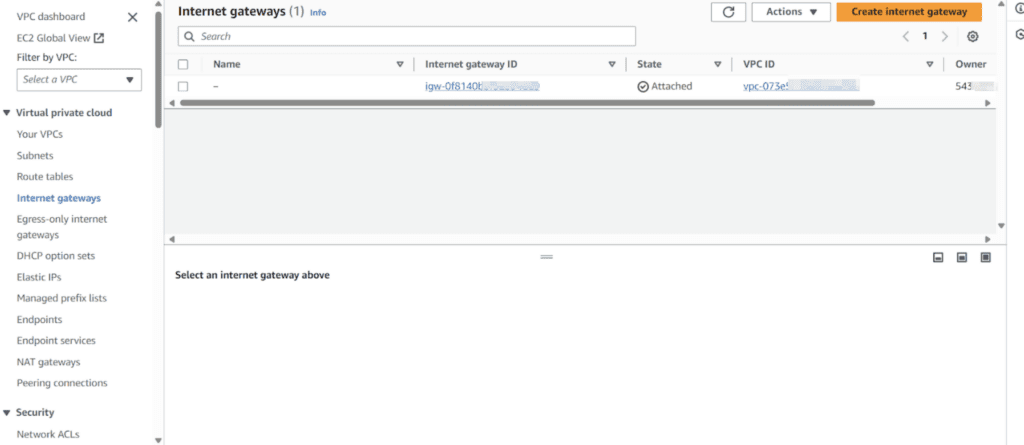
After the creation of internet gateway we need to create two route tables one for the private subnets and one for the routing of the public subnet.

Begin with the creation of a new route table for private routing in the subnet A and B.
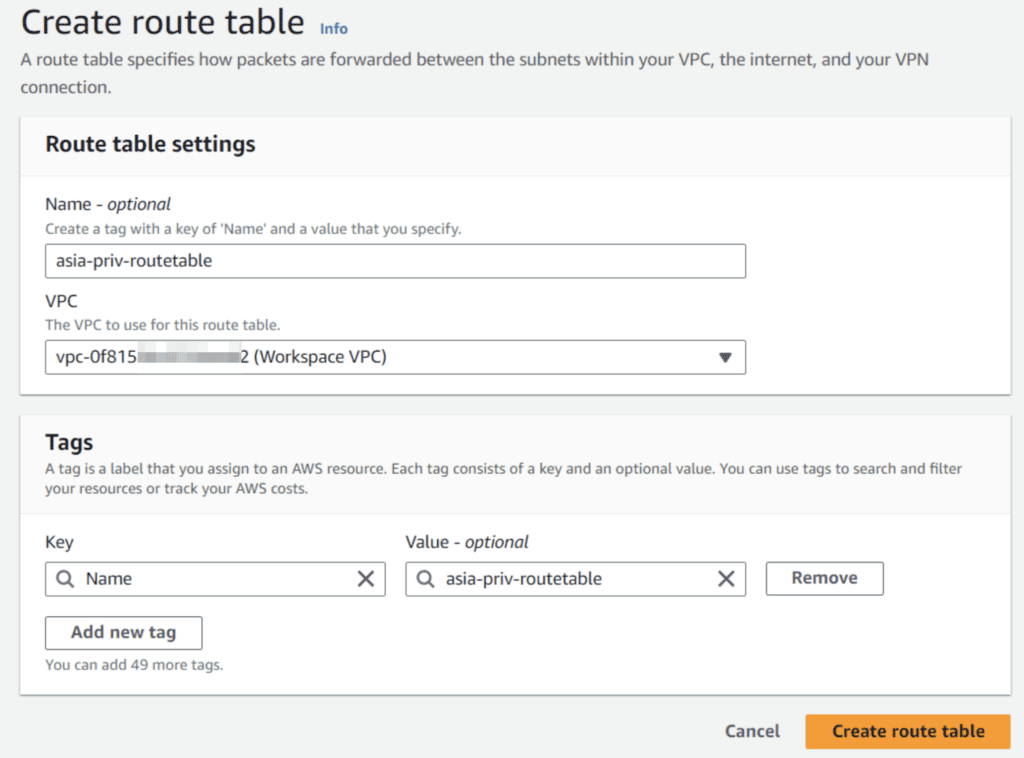
Next create a route table for the public subnet with public routing.
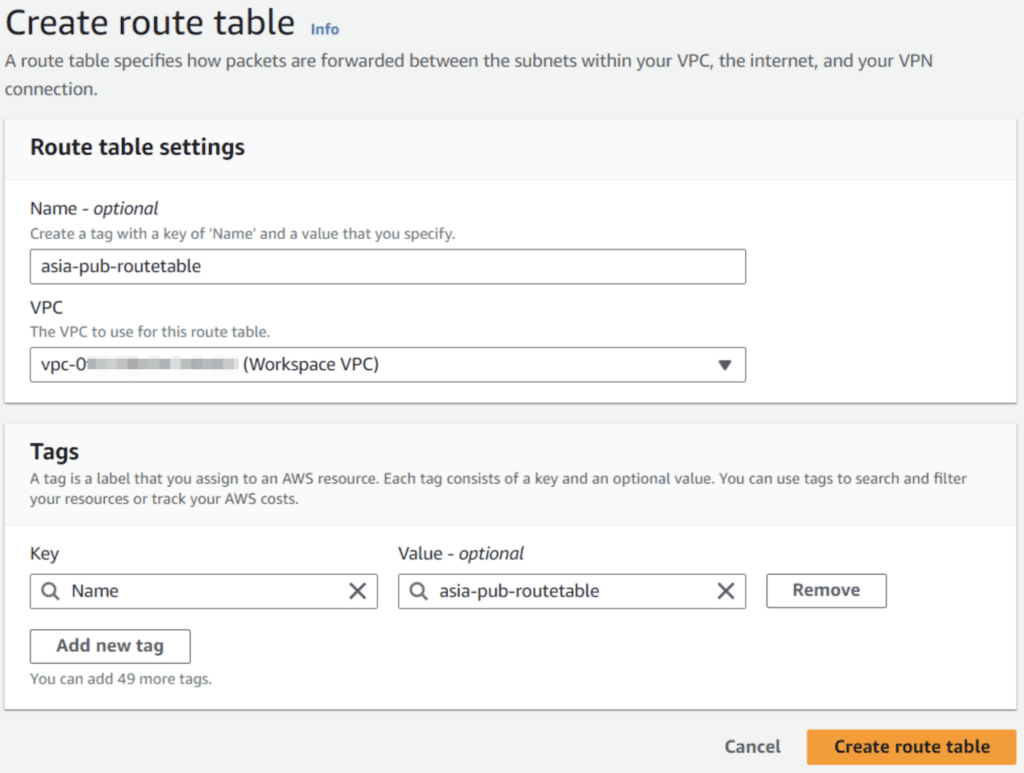
After the creation of the two routing tables we need to attacht the internet gateway to the vpc and the public subnet.
Associate public route table to public subnet in the aws portal.
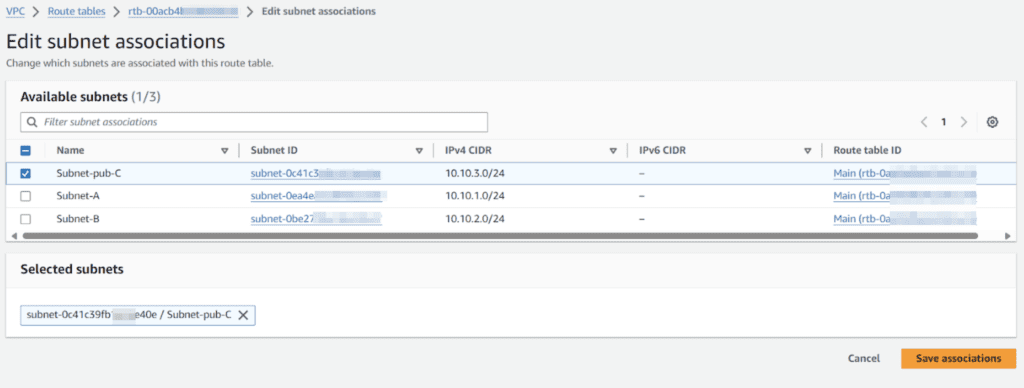
Add route 0.0.0.0/0 for internet to public internet gateway

Associate private route table with private subnets.
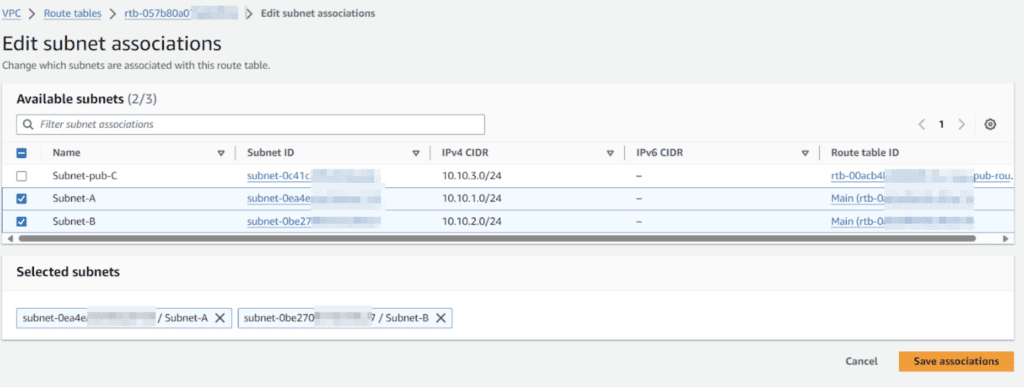
Next step create NAT gateway in public subnet so we can route the private subnets trough the public subnet.
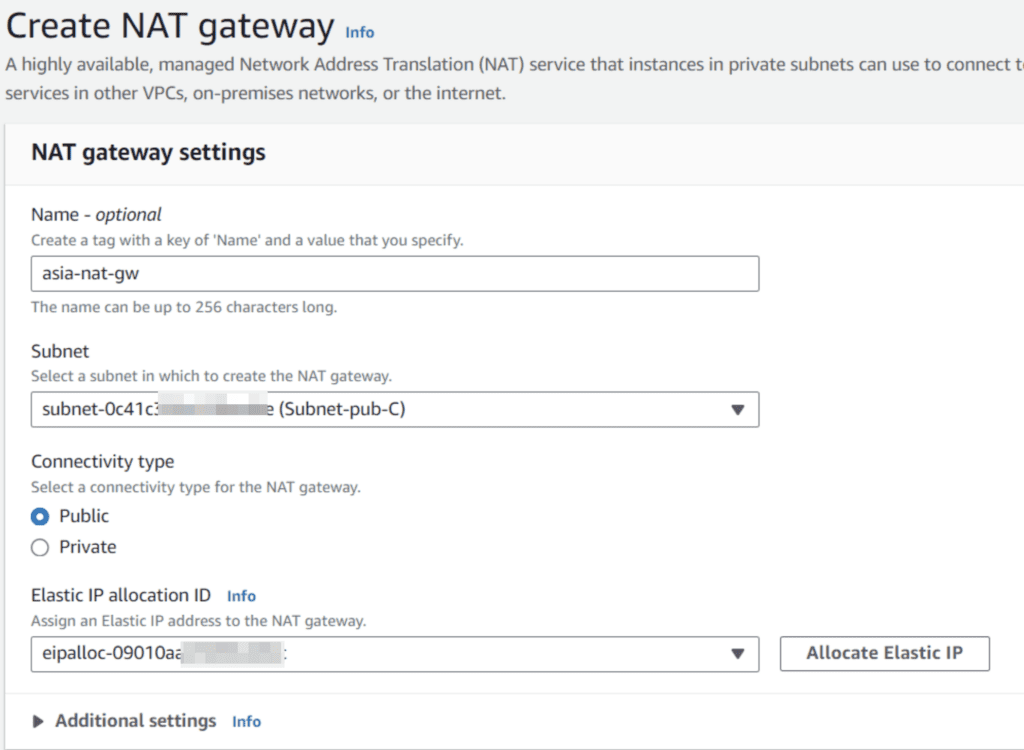
Create a NAT Gateway with a elastic ip inside the public subnet.
To Allow traffic to the intenet we must configure inbound and outbound rules for http(80) and https(443).
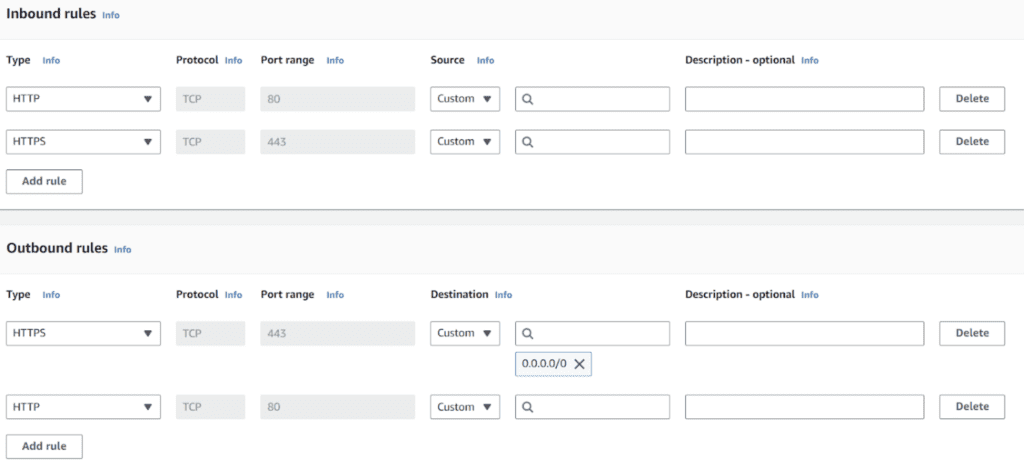
After the configuration of the Security Groups we can start to create the web portal.
Step 2: Create AWS Workspace Web – Web Portal with internet access
Inside the AWS Console search for aws WorkSpace Web and click create Web Portal
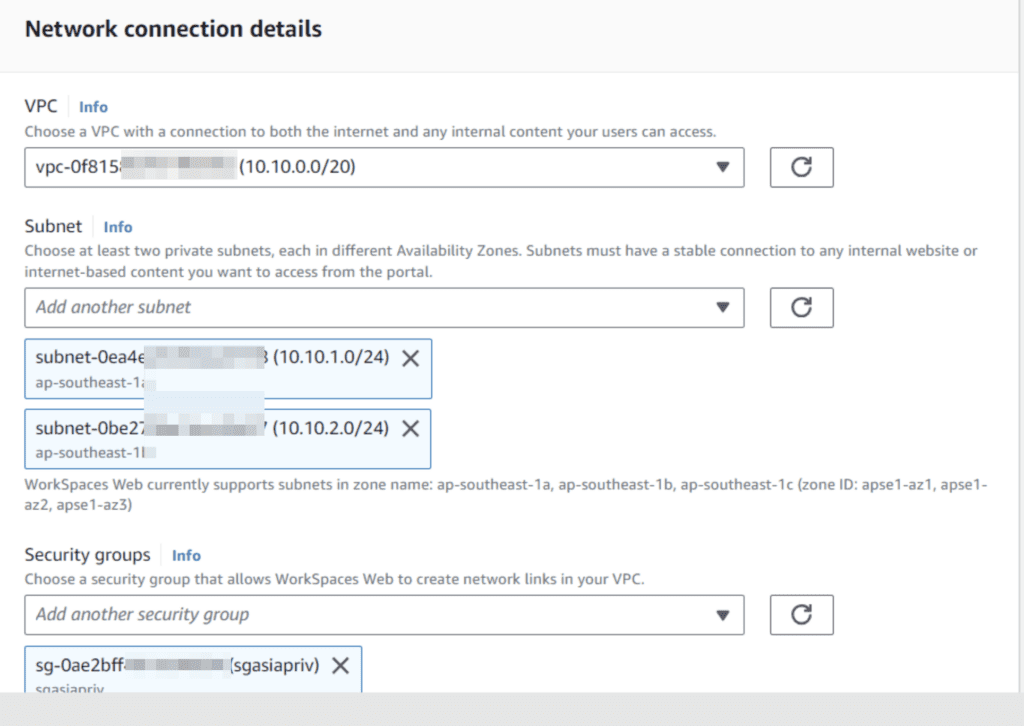
Select the VPC with the two private subnets and the security group for the web portal.
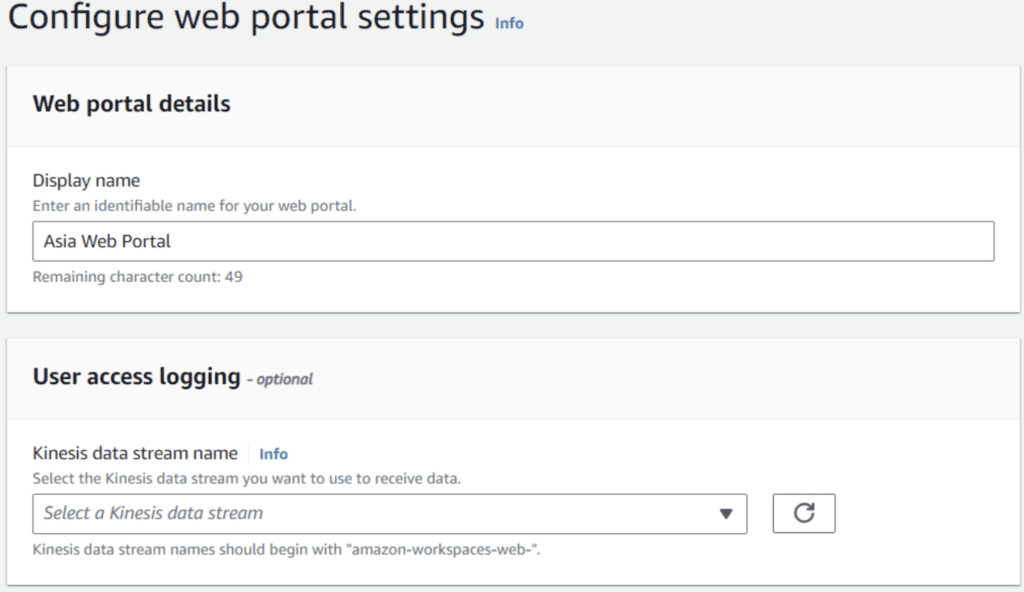
Change the name of the web portal the rest of the settings can be left as the default settings.
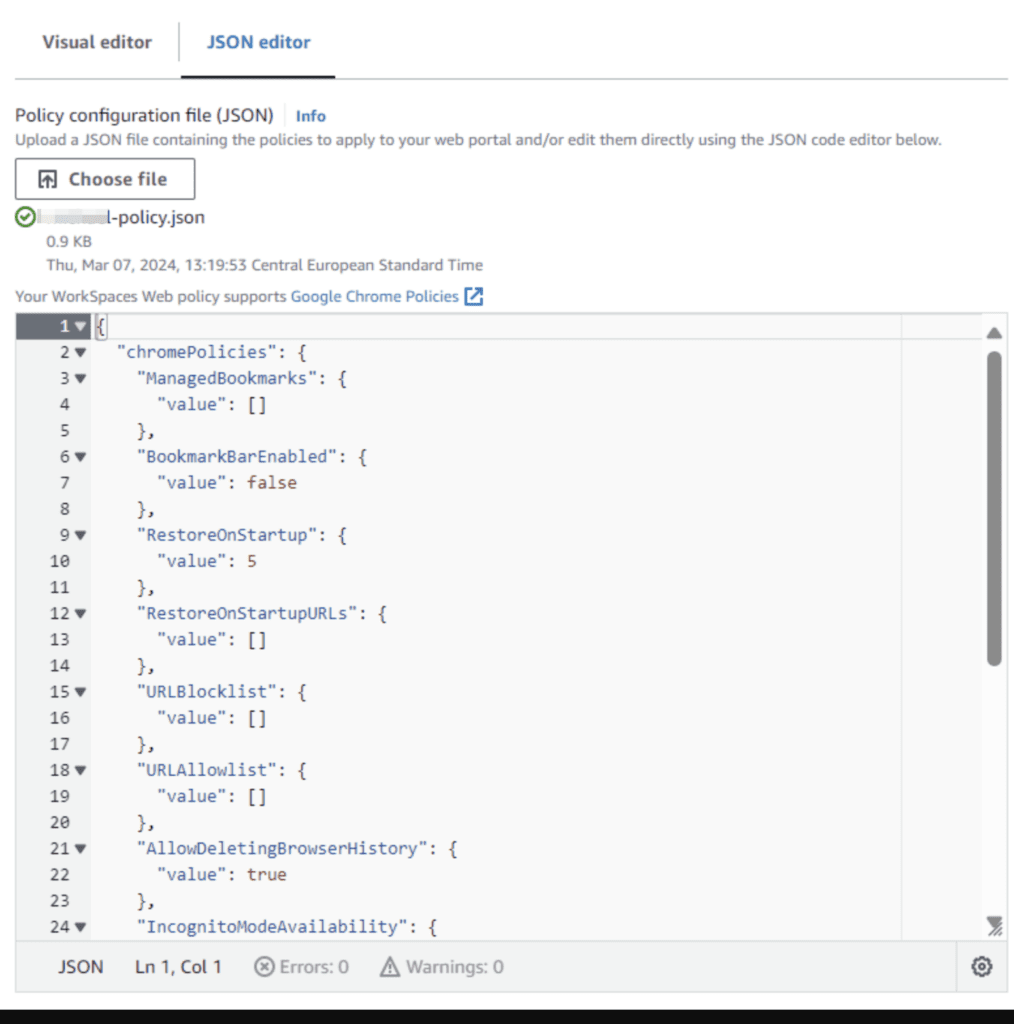
For the configuration of settings and plugins use the json editor to add settings and plugins. This is where you may control what bookmarks, extensions, whitelist and blacklist URLs, copy and paste permissions and other settings to make sure HIPAA or PCI compliance for your BPO.
Test web portal with internet access and all of the settings you configured.
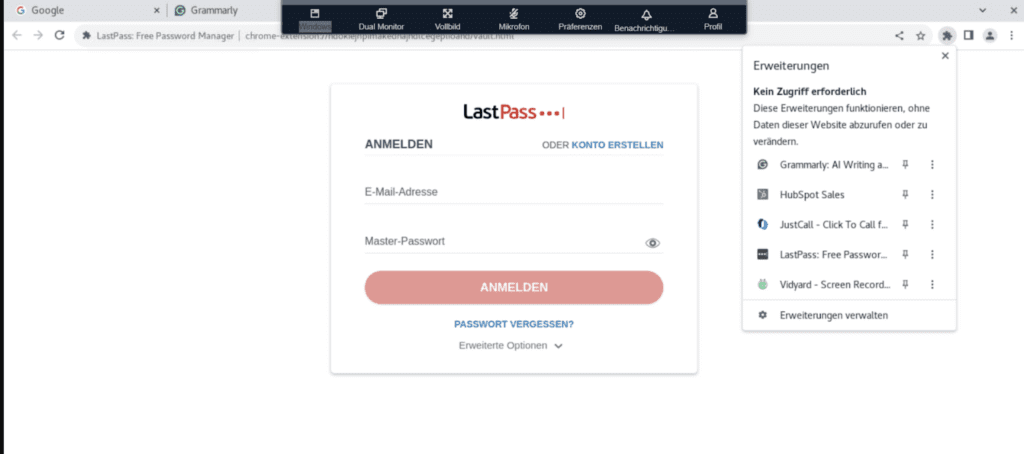
Get Chrome Extension Plugin ID to add to the JSON configuration
Install the chrome plugins on your PC and navigate to chrome://extensions
Select the plugin to get the plugin ID.
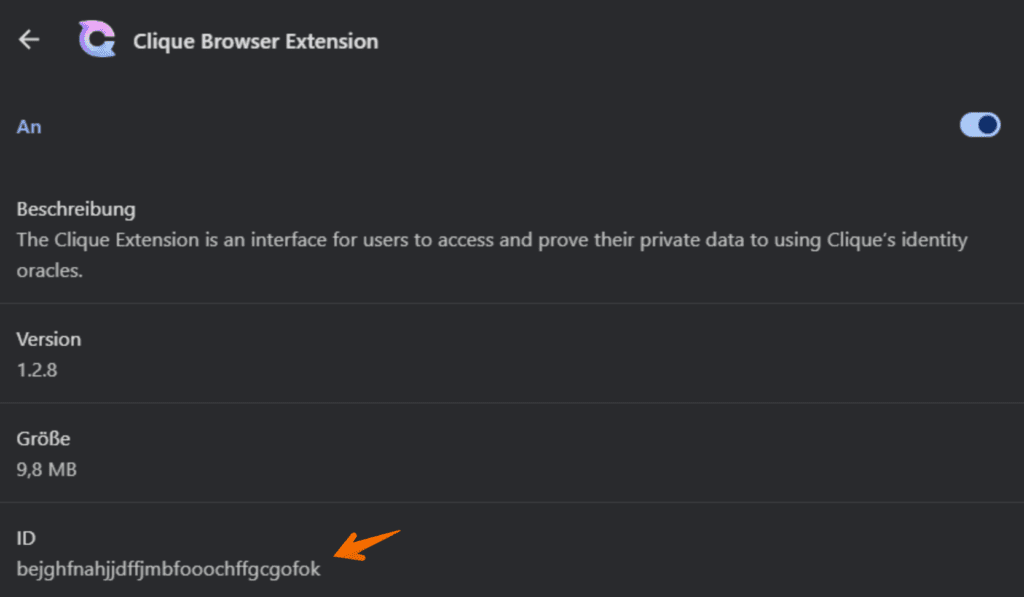
Copy the ID and add it to the json configuration file for chrome.
"ExtensionInstallForcelist": {
"value": [ "ahiickjmnblnnhjcomiegpdikaboegda;https://clients2.google.com/service/update2/crx", "hdokiejnpimakedhajhdlcegeplioahd;https://clients2.google.com/service/update2/crx", "jiihcciniecimeajcniapbngjjbonjan;https://clients2.google.com/service/update2/crx", "oiiaigjnkhngdbnoookogelabohpglmd;https://clients2.google.com/service/update2/crx",
"kbfnbcaeplbcioakkpcpgfkobkghlhen;https://clients2.google.com/service/update2/crx",
“bejghfnahjjdffjmbfooochffgcgofok; https://clients2.google.com/service/update2/crx”]
}
Your setup of AWS Workspaces Web is now complete. I recommending to give Security in Amazon Workspaces Web a read to learn more.
Finally make sure to understand all of the monitoring options available to make sure they are inline with your requirements.
Conclusion
In summary, building the Virtual Desktop Infrastructure (VDI) for Business Process Outsourcing (BPO) companies needs a well-planned and configured approach. Azure Virtual Desktop or Amazon Workspaces Web, both provide many features and benefits for remote IT management.
Azure Virtual Desktop delivers the complete virtual desktop experience, which is perfect for businesses that have a wide range of software requirements. Conversely, Amazon Workspaces Web provides a protected chromium web browser environment perfect for organizations which are mostly using web-based applications.
Moreover, enabling AutoScale for Azure Virtual Desktop and deploying AWS Workspaces Web portals also requires extra settings for best performance and security. With the knowledge of the configuration of VDI solutions, customization of user profiles, and the use of monitoring tools such as RDP Shadow, and Windows Events, BPOs can effectively manage their IT systems for remote staff.
In my opinion, a careful Azure VDI setup will improve the productivity, security, and compliance of the organizations that are managing the remote workforce in an organized manner. HelpSquad can help plan, set up, and support your VDI from start to finish. Contact us today for more information.


